
This documentation explains how to use the Paketo buildpacks to build Java applications for several common use-cases. For more in-depth description of the buildpacks’ behavior and configuration see the Paketo Java Buildpack and Paketo Java Native Image Buildpack reference documentation.
The pack CLI is used throughout the examples. pack is just one of several Cloud Native Buildpack platforms than can execute builds with the Java Buildpacks. For example, Spring Boot developers may want to explore the Spring Boot Maven Plugin or Spring Boot Gradle Plugin .
Examples assume that the Paketo Base builder is the default builder:
pack config default-builder paketobuildpacks/builder-jammy-base

All Java Buildpack examples will use the Paketo sample applications.
Examples assume that the root of this repository is the working directory:
git clone https://github.com/paketo-buildpacks/samples
cd samples
All java example images should return {"status":"UP"} from the actuator health endpoint.
docker run --rm --tty --publish 8080:8080 samples/java
curl -s http://localhost:8080/actuator/health | jq .
The Java Buildpack can build from source using any of the following build tools:
The correct build tool to use will be detected based on the contents of the application directory.
The build should produce one the of supported artifact formats. After building, the buildpack will replace provided application source code with the exploded archive. The build will proceed as described in Building from a Compiled Artifact.
Example: Building with Maven
The following command creates an image from source with maven.
pack build samples/java \
  --path java/maven
Note: The following set of configuration options are not comprehensive, see the homepage for the relevant component buildpacks for a full-set of configuration options.
For a given build <TOOL>, where <TOOL> is one of MAVEN, GRADLE, LEIN or SBT, the selected artifact can be configured with one of the following environment variable at build-time:
BP_<TOOL>_BUILT_MODULE
BP_MAVEN_BUILT_MODULE=api, Paketo Maven Buildpack will look for the application artifact with the file pattern target/api/*.[jw]ar.BP_<TOOL>_BUILT_ARTIFACT
target/*.[jw]ar for Maven, build/libs/*.[jw]ar for gradle). See component buildpack homepage for details.BP_<TOOL>_BUILT_MODULE if set to a non-default value.BP_MAVEN_BUILT_ARTIFACT=out/api-*.jar, the Paketo Maven Buildpack will select a file with name out/api-1.0.0.jar.For a given build <TOOL>, where <TOOL> is one of MAVEN, GRADLE, LEIN or SBT, the build command can be configured with the following environment variable at build-time:
BP_<TOOL>_BUILD_ARGUMENTS
-Dmaven.test.skip=true package for Maven, --no-daemon assemble for Gradle). See component buildpack homepage for details.BP_GRADLE_BUILD_ARGUMENTS=war, the Paketo Gradle Buildpack will execute ./gradlew war or gradle war (depending on the presence of the gradle wrapper).Additionally, for MAVEN, we support two other environment variables at build-time:
BP_MAVEN_ADDITIONAL_BUILD_ARGUMENTS
BP_MAVEN_BUILD_ARGUMENTS but just need one additional argument.BP_MAVEN_ADDITIONAL_BUILD_ARGUMENTS=-DskipTool, you could disable a plugin, without changing BP_MAVEN_BUILD_ARGUMENTS.BP_MAVEN_ACTIVE_PROFILES
BP_MAVEN_BUILD_ARGUMENTS but just need several profiles (de)activated.BP_MAVEN_ACTIVE_PROFILES=p1,!p2,?p3, you could activate the p1 profile, deactivate the p2 profile, and optionally activate the p3 profile, without changing BP_MAVEN_BUILD_ARGUMENTS.And similarly, for GRADLE, we support one other environment variable at build-time:
BP_GRADLE_ADDITIONAL_BUILD_ARGUMENTS
BP_GRADLE_BUILD_ARGUMENTS but just need one additional argument.BP_GRADLE_ADDITIONAL_BUILD_ARGUMENTS=--no-build-cache, you could disable build cache without changing BP_GRADLE_BUILD_ARGUMENTS.A binding with type maven and key settings.xml can be used to provide custom Maven settings.
<binding-name>
├── settings.xml
└── type
The value of settings.xml file may contain the credentials needed to connect to a private Maven repository.
Example: Providing Maven Settings
The following steps demonstrate how to use a settings.xml file from your workstation with pack.
Create a directory to contain the binding.
mkdir java/maven/binding
Indicate that the binding is of type maven with a file called type inside the binding, containing the value maven.
echo -n "maven" > java/maven/binding/type
Copy the settings.xml file from the workstation to the binding.
cp ~/.m2/settings.xml java/maven/binding/settings.xml
Provide the binding to pack build.
pack build samples/java \
   --path java/maven \
   --volume $(pwd)/java/maven/binding:/platform/bindings/my-maven-settings
If you have been developing your code on your computer, it’s very likely that Maven or Gradle have already downloaded all of the dependency JARs required to build your application. However, if you perform a pack build of your application this runs in a new container and does not by default have access to your existing Maven or Gradle cache. This means Maven and Gradle will helpfully download all of the dependencies they require again, slowing down your builds.
You can speed up builds by sharing your local Maven or Gradle cache with the container.
To do this with pack, you need to add the flag --volume $HOME/.m2:/home/cnb/.m2:rw to your pack build command. This flag will volume mount your local Maven directory into the build container so it can be used there. This command makes the volume mount read-write, which allows Maven running inside the container to download and persist additional dependencies. If you do not want this, you can make the mount read-only by changing :rw to :ro. If read-only and Maven requires a dependency not present, the build will fail.
You may do the same thing with Gradle, the flag to add is --volume $HOME/.gradle:/home/cnb/.gradle:rw. Again, you make change :rw to :ro if you prefer the mount to be read-only.
For example:
pack build samples/java \
  --path java/maven \
  --volume $HOME/.m2:/home/cnb/.m2:rw
or
pack build samples/java \
  --path java/gradle \
  --volume $HOME/.gradle:/home/cnb/.gradle:rw
When building your application from source code, the Java buildpacks will capture the output artifact from your build process, typically a JAR/WAR file, and include that in the image that is generated. If you need to include/exclude additional files you may do so by setting the BP_INCLUDE_FILES or BP_EXCLUDE_FILES environment variables. Each can be set with a colon separated list of glob patterns. If a file or directory matches then it’ll be included or excluded. If both include and exclude patterns are specified then the include patterns are applied first, followed by the exclude patterns second. By default, no additional files are included or excluded.
Any files added to the image through this process are rooted at the application directory, which is /workspace in the generated image. Files will reside under the same sub directories there as under the application source code root. If you have files under src/main/resources/foo and you use an include pattern of src/main/resources/foo/* then those files will be in the image at /workspace/src/main/resources/foo. There is not presently any way to transform the file locations, so if you require files at a specific location in the generated image you will need to use the same sub directory structure in your application source code.
pack build samples/java \
  --path java/maven
  -e BP_INCLUDE_FILES='foo/*'
NOTE: It is important to properly quote values for BP_INCLUDE_FILES and BP_EXCLUDE_FILES as they may contain wild card characters like * which the shell may interpret. Proper quoting ensures the actual characters are passed through to the buildpack.
Build tools such as Maven & Gradle can configure plugins & tasks that build Javascript assets for the frontend part of an app. The Java Buildpack can now install the node and yarn binaries for build tools to use in such tasks.
When building from source with the Maven or Gradle buildpacks, you can enable installation of Node and/or Yarn using the following environment variable:
BP_JAVA_INSTALL_NODE - set to true to enable, defaults to false.When this is set to true, the buildpack will check for the following files:
yarn.lock - both Yarn and Node will be installed via the Yarn Buildpack & Node Engine Buildpackpackage.json - only Node will be installed via the Node Engine BuildpackBy default, the above files are expected to be in the application root directory. You can configure a specific sub-directory for these files using the environment variable supported by the node-engine buildpack:
BP_NODE_PROJECT_PATH - see nodejs - Build an App from Source in a SubdirectoryExample: Building a Java app & installing Yarn dependencies
Sample Maven Plugin configuration (pom.xml):
<plugin>
<groupId>org.codehaus.mojo</groupId>
<artifactId>exec-maven-plugin</artifactId>
<version>${exec-maven.version}</version>
  <executions>
      <execution>
      <id>exec-yarn-install</id>
      <phase>generate-sources</phase>
          <goals>
              <goal>exec</goal>
          </goals>
          <configuration>
              <executable>yarn</executable>
              <arguments>
                  <argument>install</argument>
              </arguments>
          </configuration>
      </execution>
  </executions>
</plugin>
Build Command:
 pack build samples/java
--path java/maven-yarn --env BP_JAVA_INSTALL_NODE=true
An application developer may build an image from following archive formats:
The Java Buildpack expects the application directory to contain the extracted contents of the archive (e.g. an exploded JAR). Most platforms will automatically extract any provided archives.
If a WAR is detect the Java Buildpack will install Apache Tomcat. For exact set of supported Tomcat versions can be found in the Java Buildpack releases notes. For tomcat configuration options see the Apache Tomcat Buildpack.
The component buildpack for the provided artifact format will contribute a start command to the image.
Note: All three of the Apache Tomcat Buildpack, Executable Jar Buildpack, and DistZip Buildpack may opt-in during detection. However, only one of these buildpacks will actually contribute to the final image. This happens because the artifact type may be unknown during detection, if for example a previous buildpack compiles the artifact.
Example: Building from an Executable JAR
The following command uses Maven to compile an executable JAR and then uses pack to build an image from the JAR.
cd java/maven
./mvnw package
pack build samples/java \
   --path /target/demo-0.0.1-SNAPSHOT.jar
The resulting application image will be identical to that built in the Building with Maven example.
The exact JRE version that was contributed to a given image can be read from the Bill-of-Materials.
Example Inspecting the JRE Version
Please refer to the Access the SBOM article to find out how you can inspect the embedded JRE using SBOM information.
The following environment variable configures the JVM version at build-time.
BP_JVM_VERSION
BP_JVM_VERSION=8 or BP_JVM_VERSION=8.* the buildpack will install the latest patch releases of the Java 8 JDK and JRE.The Java buildpack’s default version will change periodically. The Paketo buildpack will change the default version of Java once the most recently released LTS version of Java is at least one year old. For example, Java 21 will release in September 2023. It will be added to the Paketo buildpacks immediately, but will not become the default until September 2024.
Exceptions are permitted for a shorter change cycle when deemed sufficiently urgent by a majority vote of Java sub-team contributors and maintainers.
When the default version of Java changes, the team will bump the major version of the Java buildpack and include details of the change in the release notes. In addition, the team will write a blog post and update our Slack channels prior to the change to alert community members of the upcoming change.
The following environment variable configures whether a JDK or a JRE is installed at runtime.
BP_JVM_TYPE
JRE - a JDK will be used at build-time and a JRE will be used at runtime. If no JRE dependency is found, a JDK will be installed for use as the JRE.JDK is specified, the buildpack will attempt to install a JDK for use at runtime. The security implications of using a JDK at runtime should be considered.JLink is a tool included with the JDK that allows for the generation of a customized JRE. This is supported for Java versions 9 and above, where the Java Module system is available. To run the JLink tool and install a minimal JRE for runtime, simply use the following environment variable:
BP_JVM_JLINK_ENABLED - this defaults to false, set to true to enable JLink.This will run JLink with the following default arguments:
--no-man-pages - this excludes man pages from the generated JRE--no-header-files - this excludes header files from the generated JRE--strip-debug - this strips debug information from the generated JRE--compress=1 - this enables “Constant string sharing” level compressionThe JRE generated by default will include only Java modules prefixed with java.*. If you wish to fully customize all arguments passed to JLink including which modules should be added to the generated JRE, you can use the following environment variable:
BP_JVM_JLINK_ARGS - not set by default - if any value(s) are specified here, none of the defaults listed above will be set. The variable should contain the arguments you wish to pass to the JLink tool, including the list of required modules with the argument --add-modules <comma-separated-list>.Example: Generating a minimal JRE via JLink, with custom arguments
pack build samples/java --env BP_JVM_JLINK_ENABLED=true --env BP_JVM_JLINK_ARGS="--no-header-files --compress=1 --add-modules java.base,java.se"
Generating a minimal JRE can be particularly useful when specifying a JVM Provider which does not supply its own JRE, for example, Amazon Corretto. A full JDK would normally be supplied at runtime when using such providers, as it is the only option, resulting in an unnecessarily large runtime image. Enabling JLink in this case will generate a slimmed-down JRE from the supplied JDK and ensure a significantly smaller runtime image.
The Java Buildpack configures the JVM by setting JAVA_TOOL_OPTIONS in the JVM environment.
The runtime JVM can be configured in two ways:
Buildpack-provided runtime components including the Memory Calculator accept semantically named environment variables which are then used to derive JAVA_TOOL_OPTIONS flags. Examples include:
BPL_JVM_HEAD_ROOMBPL_JVM_LOADED_CLASS_COUNTBPL_JVM_THREAD_COUNTBPL_JVM_CLASS_ADJUSTMENTFlags can be set directly at runtime with the JAVA_TOOL_OPTIONS environment variable. User-provided flags will be appended to buildpack-provided flags. If the user and a buildpack set the same flag, user-provided flags take precedence.
See the homepage for the BellSoft Liberica Buildpack for a full set of configuration options.
For example, you can add additional JVM flags to configure garbage collection, memory flags and other settings.
docker run --rm --tty \
  --env JAVA_TOOL_OPTIONS='-XX:+UseParallelGC -XX:GCTimeRatio=4 -XX:AdaptiveSizePolicyWeight=90 -XX:MinHeapFreeRatio=20 -XX:MaxHeapFreeRatio=40' \
  --env BPL_JVM_THREAD_COUNT=100
  samples/java
By default, the Paketo Java buildpack will use the Liberica JVM. The following Paketo JVM buildpacks may be used to substitute alternate JVM implementations in place of Liberica’s JVM.
To use an alternative JVM, you will need to set two --buildpack arguments to pack build, one for the alternative JVM buildpack you’d like to use and one for the Paketo Java buildpack (in that order). This works because while you end up with two JVM buildpacks, the first one, the one you’re specifying will claim the build plan entries so the second one will end up being a no-op and doing nothing.
This example will switch in the Azul Zulu buildpack:
pack build samples/jar --buildpack paketo-buildpacks/azul-zulu --buildpack paketo-buildpacks/java`
There is one drawback to this approach. When using the method above to specify an alternative JVM vendor buildpack, this alternate buildpack ends up running before the CA certs buildpack and therefore traffic from the alternate JVM vendor buildpack won’t trust any additional CA certs. This is not expected to impact many users because JVM buildpacks should reach out to URLs that have a cert signed by a known authority with a CA in the default system truststore.
If you have customized your JVM buildpack to download the JVM from a URL that uses a certificate not signed by a well-known CA, you can workaround this by specifying the CA certs buildpack to run first. This works because while you will end up with the CA certificates buildpack specified twice, the lifecycle is smart enough to drop the second one.
For example:
pack build samples/jar --buildpack paketo-buildpacks/ca-certificates --buildpack paketo-buildpacks/azul-zulu --buildpack paketo-buildpacks/java`
It does not hurt to use this command for all situations, it is just more verbose and most users can get away without specifying the CA certificates buildpack to be first.
When deploying your Java application to an application server, the default application server installed by the Paketo Java buildpack is Apache Tomcat. If you require a different application server, possibly one that supports JavaEE or JakartaEE, you may select an alternative Java application server by setting BP_JAVA_APP_SERVER when building your application.
| Application Server | BP_JAVA_APP_SERVER | Buildpack |
|---|---|---|
| Apache Tomcat | tomcat |
Paketo Apache Tomcat - Default |
| Apache Tomee | tomee |
Paketo Apache Tomee |
| Open Liberty | liberty |
Paketo Liberty |
This example will switch to using Open Liberty:
pack build samples/war -e BP_JAVA_APP_SERVER=liberty
The Paketo Java Native Image Buildpack allows users to create an image containing a GraalVM native image application.
The Java Native Buildpack is a composite buildpack and each step in a build is handled by one of its components. The following docs describe common build configurations. For a full set of configuration options and capabilities see the homepages of the component buildpacks.
The Java Native Image Buildpack supports the same build tools and configuration options as the Java Buildpack. The build must produce an executable jar.
After compiling and packaging, the buildpack will replace provided application source code with the exploded JAR and proceed as described in Building from an Executable Jar.
Example: Building a Native image with Maven
The following command creates an image from source with maven.
pack build samples/java-native \
  --env BP_NATIVE_IMAGE=true
  --path java/native-image/java-native-image-sample
An application developer may build an image from an exploded executable JAR. Most platforms will automatically extract provided archives.
Example: Building a Native image from an Executable JAR
The following command uses Maven directly to compile an executable JAR and then uses the pack CLI to build an image from the JAR.
cd samples/java/native-image
./mvnw package
pack build samples/java-native \
  --env BP_NATIVE_IMAGE=true
  --path java/native-image/java-native-image-sample/target/demo-0.0.1-SNAPSHOT.jar
The resulting application image will be identical to that built in the “Building a Native image with Maven” example.
The exact Native Image version that was contributed to a given image can be read from the Bill-of-Materials.
Example Inspecting the JRE Version
Please refer to the Access the SBOM article to find out how you can inspect the JRE using SBOM information.
By default, the Paketo Java Native Image buildpack will use BellSoft’s Native Image Toolkit. The following Paketo JVM buildpacks may be used to substitute alternate Native Image Toolkit implementations in place of the default.
| JVM | Buildpack |
|---|---|
| BellSoft Liberica | Paketo Buildpack for BellSoft Liberica |
| GraalVM Community Edition | Paketo Buildpack for GraalVM Community Edition |
| Oracle GraalVM | Paketo Buildpack for Oracle |
To use an alternative Java Native Image Toolkit, you will need to set two --buildpack arguments to pack build, one for the alternative Java Native Image Toolkit buildpack you’d like to use and one for the Paketo Java Native Image buildpack (in that order). This works because while you end up with two Java Native Image Toolkit buildpacks, the first one, the one you’re specifying will claim the build plan entries so the second one will end up being a no-op and doing nothing.
This example will switch in the GraalVM Community Edition buildpack:
pack build samples/native-image --buildpack paketo-buildpacks/graalvm --buildpack paketo-buildpacks/java-native-image`
There is one drawback to this approach. When using the method above to specify an alternative Java Native Image Toolkit vendor buildpack, this alternate buildpack ends up running before the CA certs buildpack and therefore traffic from the alternate Java Native Image Toolkit vendor buildpack won’t trust any additional CA certs. This is not expected to impact many users because Java Native Image Toolkit buildpacks should reach out to URLs that have a cert signed by a known authority with a CA in the default system truststore.
If you have customized your Java Native Image Toolkit buildpack to download the Java Native Image Toolkit from a URL that uses a certificate not signed by a well-known CA, you can workaround this by specifying the CA certs buildpack to run first. This works because while you will end up with the CA certificates buildpack specified twice, the lifecycle is smart enough to drop the second one.
For example:
pack build samples/jar --buildpack paketo-buildpacks/ca-certificates --buildpack paketo-buildpacks/graalvm --buildpack paketo-buildpacks/java-native-image`
It does not hurt to use this command for all situations, it is just more verbose and most users can get away without specifying the CA certificates buildpack to be first.
Please refer to the Access the SBOM article to find out how you can inspect the Spring Boot application dependencies using SBOM information.
The Spring Boot Buildpack adds Spring Cloud Bindings to the application class path. Spring Cloud Bindings will auto-configure the application to connect to an external service when a binding of a supported type provides credentials and connection information at runtime. Runtime auto-configuration is enabled by default but can be disabled with the BPL_SPRING_CLOUD_BINDINGS_DISABLED environment variable at runtime or the BP_SPRING_CLOUD_BINDINGS_DISABLED environment variable at build time.
Application Monitoring has been moved to a new page. Please see the Application Monitoring.
By default, Java will be the only process running in your container. This prohibits one from restarting Java within the container. If you need to be able to restart Java but not the whole container, perhaps to facilitate a shorter ‘inner loop’ for development, for quickly testing configuration changes or in conjunction with a tool like Tilt you may do so using the process reloading support.
To enable, set BP_LIVE_RELOAD_ENABLED=true. If BP_LIVE_RELOAD_ENABLED is true at build-time then the Executable Jar Buildpack or the Dist Zip Buildpack will request that watchexec is installed and they will contribute a default process type named reload. This process type will use watchexec as the primary process and Java as a child process of watchexec.
Example: Reloadable Process
The following commands build an image with a default reloadable process type.
pack build samples/java \
  --path java/jar \
  --env BP_LIVE_RELOAD_ENABLED=true
The output will confirm a reload process type has been added.
Paketo Executable JAR Buildpack v5.4.0
  https://github.com/paketo-buildpacks/executable-jar
  Class Path: Contributing to layer
    Writing env/CLASSPATH.delim
    Writing env/CLASSPATH.prepend
  Process types:
    executable-jar: java org.springframework.boot.loader.JarLauncher (direct)
    reload:         watchexec -r java org.springframework.boot.loader.JarLauncher (direct)
    task:           java org.springframework.boot.loader.JarLauncher (direct)
    web:            java org.springframework.boot.loader.JarLauncher (direct)
You may also run pack inspect samples/java which will show you the process types.
You can use Tilt with the Paketo Java Buildpacks. This uses the Pack Tilt extension. The example below shows how to use the pack extension and how to configure watched files.
Example: Tilt
git clone https://github.com/tilt-dev/tilt-example-javacd tilt-example-java/0-baseTiltfile to look like this:
        load('ext://pack', 'pack')

    pack(
        'example-java-image',
        deps=['./bin/main'],
        live_update = [
            sync('./bin/main', '/workspace/BOOT-INF/classes'),
        ],
    )
    k8s_yaml('kubernetes.yaml')
    k8s_resource('example-java', port_forwards=8000)


    Copied!
Execute tilt up.
You should now be able to view your application running on your Kubernetes cluster by going to http://localhost:8000 in your browser. In addition, if you edit files in your IDE, save and rebuild you should see those change live-reloaded into the application.
The Tiltfile above will use the Pack Tilt extension, which in turn will run pack build to create an image from your application.
In addition, we configure Tilt to watch ./bin/main/**. These files when modified will trigger an update in the container. The live_update block indicates which files locally will update and where they will be placed in the live container. We are instructing everything under ./bin/main to be added into /workspace/BOOT-INF/classes when an update is triggered. This takes classes and resources compiled locally by an IDE and injects them into the location where application classes are stored in the container image.
This example is tuned for use with Visual Studio Code and its Java and Gradle extensions. These will compile code changes on save and put the compiled output in ./bin/main. If you use a different IDE or Gradle/Maven directly, you will need to adjust the deps and live_update directories accordingly.
This functionality presently depends on the support of watchexec. It is recommend that you read the section Enable Process Reloading for further details.
DEBUG logging
Users of the Java buildpack can access extra debug logs during the image build process by setting the BP_LOG_LEVEL
environment variable to DEBUG at build time. Additional debug logs will
appear in build logs if the relevant buildpacks have debug log lines.
pack build my-app --buildpack paketo-buildpacks/java \
  --env BP_LOG_LEVEL=DEBUG
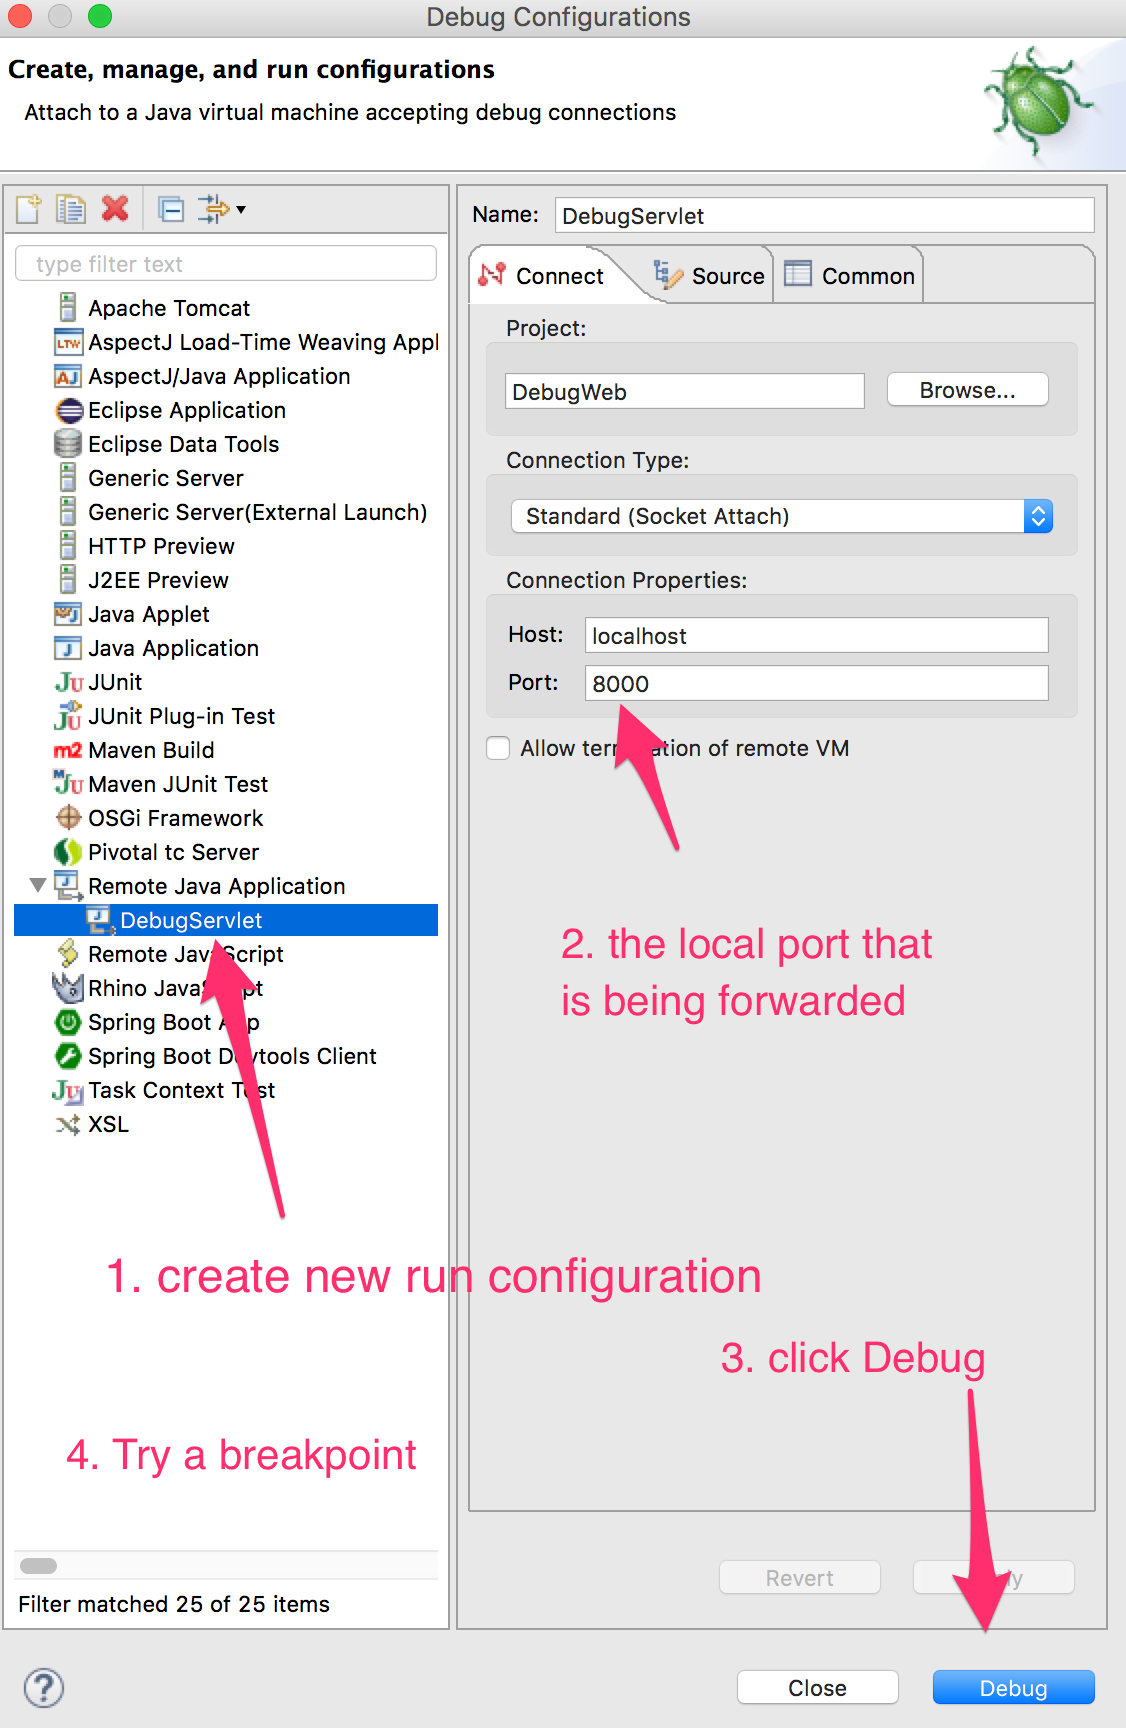
If BPL_DEBUG_ENABLED is set to true at runtime the application will be configured to accept debugger connections. The debug port defaults to 8000 and can be configured with BPL_DEBUG_PORT at runtime. If BPL_DEBUG_SUSPEND is set at runtime, the JVM will suspend execution until a debugger has attached.
Example: Remote Debugging
The following command builds a debug-enabled image.
pack build samples/java \
  --path java/jar
To run an image with the debug port published:
docker run --env BPL_DEBUG_ENABLED=true --publish 8000:8000 samples/java
Connect your IDE debugger to connect to the published port.
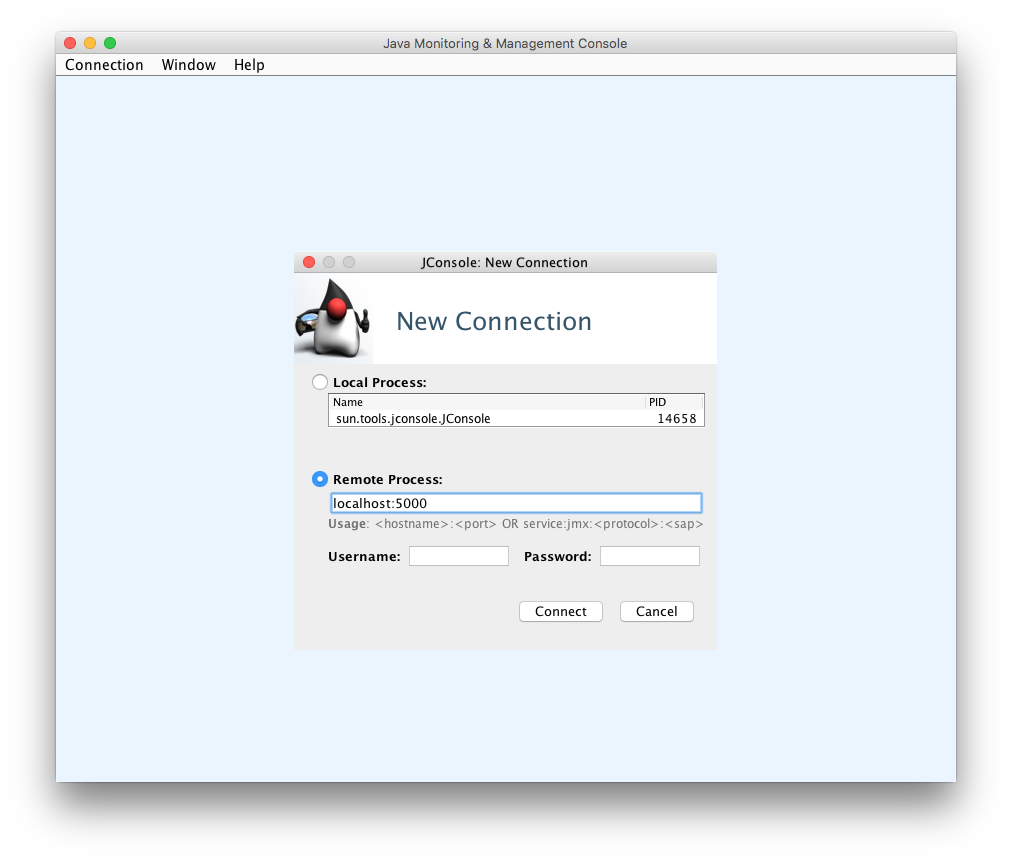
If BPL_JMX_ENABLED is set at runtime, the application will be configured to accept JMX connections. The JMX connector will listen on port 5000 by default. The port can be configured with the BPL_JMX_PORT environment variable at runtime.
Example: Enabling JMX
The following command builds a JMX-enabled image.
pack build samples/java \
  --path java/jar
To run an image with the JMX port published:
docker run --env BPL_JMX_ENABLED=true --publish 5000:5000 samples/java
Connect JConsole to the published port.
By default for Java 11+, the JVM will be configured to track internal memory usage. The JVM will print its last memory usage data when it exits, the level of detail can be configured at runtime by setting the environment variable BPL_JAVA_NMT_LEVEL, which supports both summary (default) and detail. Since there is a small amount of overhead required to support NMT, it can be disabled by setting the environment variable BPL_JAVA_NMT_ENABLED to false.
Example: Capturing NMT output
To capture NMT data using the JDK tool jcmd, first ensure that you have a JDK installed at runtime (see Install a Specific JVM Type).
Then run the following to start a bash session on a running container, with jcmd available on the $PATH variable:
docker exec -it <container-id> /cnb/lifecycle/launcher /bin/bash
From inside the new bash session, you can run the following to view the NMT data:
jcmd 1 VM.native_memory summary
The first argument should be the JVM PID, in the case of the Paketo Java buildpack, this will be 1.
At the moment, there is a bug in Java 8 that prevents Java NMT from being used. If you attempt to use it with Java 8 in a buildpack generated container, the JVM will crash on startup. The Java buildpack has disabled Java NMT when you are using Java 8, so users are not impacted by the bug. At the same time, it is not presently possible to enable Java NMT if you are running Java 8.
A fix for this issue has been submitted upstream to OpenJDK. It will take time for this fix to be accepted and picked up by all of the Java vendors. We are monitoring this situation, and as Java vendors pick up this fix we will re-enable Java NMT support for Java 8 users in the buildpack.
Java NMT support does not work with Reloadable Processes. This is because when using reloadable processes, the JVM PID is not 1 and not easily determinable by the buildpack Java NMT helper. Thus the helper cannot set the environment variables required by the JVM to enable Java NMT.
If you attempt to enable Java NMT and are using Reloadable Processes, that’s OK. The JVM will not enable Java NMT and it will output the following messages.
OpenJDK 64-Bit Server VM warning: Native Memory Tracking did not setup properly, using wrong launcher?
OpenJDK 64-Bit Server VM warning: PrintNMTStatistics is disabled, because native memory tracking is not enabled
Your application should continue to run, but with Java NMT disabled.
If BPL_JFR_ENABLED is set to true at runtime, Java Flight Recording features will be enabled by the JVM. To configure JFR via its supported arguments, add them to the optional environment variable BPL_JFR_ARGS at runtime.
Two default arguments are configured for JFR as follows:
dumponexit - this is set to true to write the recording data to a file when the JVM exitsfilename - this is set to <system-temp-dir>/recording.jfr (i.e. /tmp/recording.jfr) and is the location where the recording data will be written on JVM exitIf any args are provided via BPL_JFR_ARGS, these defaults will not be configured.
Example: Enabling & configuring JFR
The following command builds a JFR-enabled image.
pack build samples/java \
  --path java/jar
To run an image with JFR enabled and optionally configure it with custom arguments:
docker run --env BPL_JFR_ENABLED=true --env BPL_JFR_ARGS=filename=/tmp/my-recording.jfr,duration=60s samples/java
Additional arguments can be provided to the application using the container CMD. In Kubernetes set CMD using the args field on the container resource.
Example: Setting the Server Port
Execute the following command passes an additional argument to application start command, setting the port to 8081.
docker run --rm --publish 8081:8081 samples/java --server.port=8081
curl -s http://localhost:8081/actuator/health
To override the buildpack-provided start command with a custom command, set the container ENTRYPOINT
Example: Starting an Interactive Shell
The following command runs Bash interactively:
docker run --rm --entrypoint bash samples/java
Every buildpack-generated image contains an executable called the launcher which can be used to execute a custom command in an environment containing buildpack-provided environment variables. The launcher will execute any buildpack provided profile scripts before running to provided command, in order to set environment variables with values that should be calculated dynamically at runtime.
To run a custom start command in the buildpack-provided environment set the ENTRYPOINT to launcher and provide the command using the container CMD.
Example: Inspecting the Buildpack-Provided JAVA_TOOL_OPTIONS
The following command will print value of $JAVA_TOOL_OPTIONS set by the buildpack:
docker run --rm --entrypoint launcher samples/java echo 'JAVA_TOOL_OPTIONS: $JAVA_TOOL_OPTIONS'
Each argument provided to the launcher will be evaluated by the shell prior to execution and the original tokenization will be preserved. Note that, in the example above 'JAVA_TOOL_OPTIONS: $JAVA_TOOL_OPTIONS' is single quoted so that $JAVA_TOOL_OPTIONS is evaluated in the container, rather than by the host shell.
For Apache software, the Paketo project pulls downloads from the main Apache Downloads CDN. This provides users with the fastest possible downloads. The drawback of this is that Apache only hosts the most recent versions of software on this CDN. This causes older versions of our buildpacks to fail, because those older versions will still be looking at the Apache CDN for their downloads, but Apache has moved them off to the Archive Site. Because of the nature of container images and the fact that those download links are in the container image, we cannot go back and update our images.
If you need to use an older version of Apache Tomcat or Apache Tomee (or other Apache software) and you are hitting this issue, you can use the Dependency Mirror feature to continue accessing older software. You just need to set the following environment variable at build time, typically with the -e argument to pack build.
Example:
BP_DEPENDENCY_MIRROR_DOWNLOADS_APACHE_ORG=https://archive.apache.org/dist
When the build runs, you should see the buildpack swap in the archive.apache.org hostname and download from that location.
The same is true for YourKit, you just need a different environment variable. The following will switch downloads to come from their archive mirror.
BP_DEPENDENCY_MIRROR_DOWNLOAD_YOURKIT_COM=https://archive.yourkit.com
Last modified: March 30, 2026